
Weedo X40 Wifi / Camera Modul
Modul specification
- Controller ESP32
- Camera
- Video streaming 640*480 pixel (MJPG encoding), With tricks also 800x600 pixel
- Still picture 1024*768 pixel (JPEG), with Quality 15 or higher up to 1600 x 1200 pixel (JPEG) - MicroSD Flashcard 4GB / 8GB
- WIFI
- 802.11b/g/n wireless network (only 2.4GHz frequency band) with AP (Access Point) and STA (Station) mode
More Informations:
- ESP32-CAM Video Streaming and Face Recognition with Arduino IDE
- https://www.fambach.net/esp32-cam-modul/
Setup
View the image from the Weedo X40 webcam through a browser:
You can display the images from the Weedo X40 camera on a browser without a special app. The printer only has to be registered in your network and you have to know the IP address of the printer or assign a name to the printer in the router.
Camera settings GUI:
http://IP-address:8080/
To stream the live video, enter the following in the browser:
http://IP-address:8080/?action=stream
To take a webcam photo, enter the following in the browser:
http://IP-adress:8080/capture
With, the printer has the IP address 192.168.178.41 and the name Weedo-X40. So it is also possible:
http://192.168.178.41:8080/?action=streamhttp://Weedo-X40:8080/?action=streamhttp://192.168.178.41:8080/?action=stophttp://192.168.178.41:8080/stream
Camera status
http://192.168.178.41:8080/status
Camera resolution
http://192.168.178.41:8080/control?var=framesize&val=11
| Value | Resolution |
| 0 | THUMB (96x96) |
| 1 | QQVGA (160x120) |
| 3 | HQVGA (240x176) |
| 5 | QVGA (320x240) |
| 6 | CIF (400x296) |
| 7 | HVGA (480x320) |
| 8 | VGA (640x480) |
| 9 | SVGA (800x600) |
| 10 | XGA (1024x768) |
| HD (1280x720) | |
| 11 | SXGA (1280x1024, works only with low quality, quality=15) |
| 12 | UXGA (1600x1200, works only with low quality, quality=15) |
Camera settings
Call http://192.168.178.41:8080/control?var=<key>&val=<val> with a settings key and value to set camera properties or trigger actions.
|
<key> |
<val> |
Example |
|
quality |
10 to 63 |
http://192.168.178.41:8080/control?var=quality&val=15 |
|
contrast |
-2 to 2 |
http://192.168.178.41:8080/control?var=contrast&val=1 |
|
brightness |
-2 to 2 |
http://192.168.178.41:8080/control?var=brightness&val=1 |
|
saturation |
-2 to 2 |
http://192.168.178.41:8080/control?var=saturation&val=0 |
|
ae_level |
-5 to 5 |
http://192.168.178.41:8080/control?var=ae_level&val=-1 |
|
special_effect |
0=No Effect 1=Negative 2=Grayscale 3=Red Tint 4=Green Tint 5=Blue Tint 6=Sepia |
http://192.168.178.41:8080/control?var=special_effect&val=2 |
|
awb |
0 = disable 1 = enable |
http://192.168.178.41:8080/control?var=awb&val=1 |
|
awb_gain |
0 = disable 1 = enable |
http://192.168.178.41:8080/control?var=awb_gain&val=1 |
|
wb_mode |
if awb enabled: 0=Auto 1=Sunny 2=Cloudy 3=Office 4=Home |
http://192.168.178.41:8080/control?var=wb_mode&val=3 |
|
aec |
0 = disable 1 = enable |
http://192.168.178.41:8080/control?var=aec&val=1 |
|
aec_value |
0 to 1200 |
http://192.168.178.41:8080/control?var=aec_value&val=200 |
|
aec2 |
0 = disable 1 = enable |
http://192.168.178.41:8080/control?var=aec2&val=1 |
|
ae_level |
-2 to 2 |
http://192.168.178.41:8080/control?var=ae_level&val=0 |
|
agc |
0 = disable 1 = enable |
http://192.168.178.41:8080/control?var=agc&val=0 |
|
agc_gain |
0 to 30 |
http://192.168.178.41:8080/control?var=agc_gain&val=20 |
|
gainceiling |
0 to 6 |
http://192.168.178.41:8080/control?var=gainceiling&val=2 |
|
hmirror |
0 = disable 1 = enable |
http://192.168.178.41:8080/control?var=hmirror&val=0 |
|
vflip |
0 = disable 1 = enable |
http://192.168.178.41:8080/control?var=vflip&val=0 |
More Information see: https://github.com/easytarget/esp32-cam-webserver/blob/master/API.md
Software
see https://gist.github.com/georoen/d12a98b2b5591efa4ce5c91d38bd9d2e
Capture and download still image
curl --xattr -o myimage.jpg http://192.168.178.41:8080/capture
Transmitting a gcode file via WIFI to the Weedo X40
Provide your file and IP address accordingly
curl
 -H "X-Api-Key: AAAAAAAAAAAAAAAAAAAA4AAAAAAAA" -F "file=@myfile.gcode"
-F "select=true" -F "print=false" "http://192.168.178.41/api/files/local"
Transmitting and print a gcode file via WIFI to the Weedo X40
Provide your file and IP address accordingly
curl -H "X-Api-Key: AAAAAAAAAAAAAAAAAAAA4AAAAAAAA" -F "file=@myfile.gcode" -F "select=true" -F "print=true" "http://192.168.178.41/api/files/local"
Base for a new Plugin? (Cura Network Plugin for Monoprice Select Mini V2)
- Details
- Hits: 2355
Weedo X40 vs. Weedo X40 PRO
Here is a feature comparison between the Weedo X40 with stock firmware and the Weedo X40 PRO with firmware version 1.2.5.9. There are no feature differences between the hardware variants V1 and V2, so no differentiation is made here.
Anyone who knows the Weedo 1.2.5 Stock Firmware will notice significant differences to the X40 PRO firmware!
Improvements have been integrated into many corners and bugs fixed.
| Feature | Weedo X40 | Weedo X40 PRO |
| Target group | Hobby user, Maker | Professionals, Designer and Engineers |
| Usable hardware | Weedo X40V1, Weedo X40V2 | Weedo X40V1, Weedo X40V2 |
| Firmware | 1.2.5 (latest Stock Firmware) | 1.2.5.9 (Community Firmware) |
| Printer calibration | An approximately correct calibration was saved in the printer by Weedo | Each user has to do this for their own printer. An exact calibration depends on the exact dimensions of the printer, the belt tension and if necessary configuration. Just installing firmware is not enough! |
| Supported Slicer | Wiibuilder, Weedo Cura | Ultimaker Cura 4.X and 5.X with X40 Community configuration |
| Calibration | Not necessary, since no dimensional accuracy is required | Extruder, axes and PID calibration required |
| Printing temperature | up to 260°C | up to 260°C, with HT upgrade up to 280°C |
| Part coolingsystem | Weedo X40 | X40-Community with better cooling |
| Usable Filaments | All material up to 260°C, but not soft TPU and cooling-intensive filaments | All material up to 260°C (280°C), but not soft TPU |
| Preview image | Yes | Yes with Cura plugin for Weedo X40 PRO |
| Automatic bed leveling | 3 x 3 (9 Points) | 5 x 5 (25 Points) |
| Repeatability Z homing and bed leveling | bad (software bug) | good |
| XY-Offset adjustment accuracy | 0,1mm | 0,01mm |
| Z-Offset adjustment accuracy | 0,05mm | 0,02mm |
| Z baby steps | 0,05mm | 0,02mm |
| Temperature selection at filament feed | 4 options | 6 options |
| Parameter backup and restore | Just some parameters | All important setup parameters |
| POST (Self-test) default | Enabled | Disabled |
| Display information | The weight was not calculated correctly, therefore unusable |
The weight information has been replaced by information about the used extruder and nozzle diameter |
| Additional gcode commands | None |
|
| Bug fixes and improvements | None |
|
| Options | None |
|
- Details
- Hits: 2511
Weedo X40 WiFi Setup
The Weedo X40 printer is equipped with a WiFi connection via the webcam. With the WiFi connection, not only the photos/videos from the webcam can be viewed in the LAN, but gcode data can also be uploaded. A 4GB Flash is installed for this purpose, in which the data is stored.
The wireless network module supports the 802.11b/g/n standard. The WiFi connection is limited to the 2.4GHz frequency range. The module controls the AP (Access Point) and STA (Station) mode.
Setup
A smartphone, tablet or laptop with WiFi is required to establish the connection!
- Turn on the printer and search for the Wifi webcam with your SmartPhone, tablet or laptop. The name of the webcam consists of "WIFICAM" and the serial number of the printer.
- Connect your SmartPhone, Tablet, WIFI PC to the printer.
-
Start a browser and enter the following address in the input line: http://10.10.0.1:88/
Then you can access to the WiFi network management page. -
Scan the WLAN with Network Management. Click on your network name, enter your WiFi password, and wait for a moment, WIFICAM will try to connect to the network.
- After the WLAN connection to your router has been established, the IP address is shown on the printer display.
Router setup
After you have established the WLAN connection with your router, it is helpful to be able to address the printer using a suitable name. With AVM routers and many other manufacturers, you can assign a name to the dynamic IP address.
If you give the printer IP address the name "Weedo-X40", then the webcam will also work immediately with our OctoPi distribution without any changes.
If you cannot assign a name to the IP address in the router, you should assign a static IP address to the printer so that you do not have to look for the IP address every time the printer is restarted.
- Details
- Hits: 18063
Weedo X40 USB Setup
The Weedo X40 mainboard R73 is equipped with the USB chip CH340G for connecting the printer to a PC. Since almost all PC operating systems do not have a suitable driver, you have to install the driver manually, otherwise no connection can be established.
The driver is also required if you want to install firmware updates with the Flashing Software!
Since installing drivers on the Raspberry Pi is not that easy and requires a lot of specialist knowledge, we have created a ready-to-use OctoPi distribution. As an X40 community member, you can simply download the finished image from the cloud and install it on the microSD card. Nothing more is necessary.
USB Setup
Depending on the operating system, install the appropriate drivers.
Transfer rate
For example, to connect Pronterface or Octoprint to the Weedo X40 printer, please set the baud rate to 115200.
Connect the Ultimaker Cura to the printer via USB
In order to be able to connect Ultimaker Cura to the printer, the Ultimaker Cura software must be patched because the software does not support the required settings.
For more information see: Cura USB print
- Details
- Hits: 17288
X40 PRO High Temperature upgrade (for Weedo X40V1 and Weedo X40V2)
The Weedo X40V1, V2 and V3 are equipped with 24V 50 Watt cartridge heaters. These heating cartridges not only allow rapid heating, but also temperatures of over 300°C. The Weedo V1 and V2 are sealed at 260°C because a stainless steel heat brake with PFTE hose is used. PFTE decomposes at temperatures above 260°C with highly toxic fumes. The fumes are said to be so toxic that even animals can die in poorly ventilated rooms. However, Weedo has shown with the Weedo X40V3 and ME40 that with the right heat brake it is possible to operate the printer at temperatures of up to 300°C.
In this article I would like to show you how you can easily convert the X40 PRO version to the X40 PRO HT (High Temperature) versions.
See Youtube Video Weedo X40 PRO High Temerature upgrade.
Danger:
| Attention, a small guarantee is given for the conversion. Conversion at your own risk! The construction has been extensively tested. But if you don't replicate it exactly and use other parts, materials, then in the worst case it can lead to a fire! The construction was also not checked for any toxic gases that might be produced. However, the hardware also showed no abnormalities that the PTFE hose is too hot. Never use the stainless steel Heatbrakes from the Weedo X40V1 and X40V2 for the high temperatures. Otherwise, highly toxic gases can be produced as a result of the decomposition of the PFTE! |
The Heatbrake
The Weedo X40 Heatbrake is a 31mm long tube that has an M6 thread at the heater end and a 6mm diameter at the other end. The heat brake has the task of separating the hot part from the cold part. If possible, only the heating block and the nozzle should be hot and the temperature should not fluctuate greatly.
The Weedo X40V1 and V2 use a stainless steel tube with an inside PTFE tube and a powerful fan on the cooler (Infos). This construction works well up to about 250°C if the pullback is not set too high. Problems can arise if the retraction is too great or if the temperatures are higher, since the heat travels too far up and the filament softens too early. The result is constipation. At temperatures above 260°C, the PFTE would decompose and the printer would be damaged.
In order to be able to print temperatures above 260°C, a bimetal heat brake made of titanium and copper is therefore required. Titanium conducts heat poorly and copper very well. This combination keeps the hot part hot and the cold part well below 260°C.
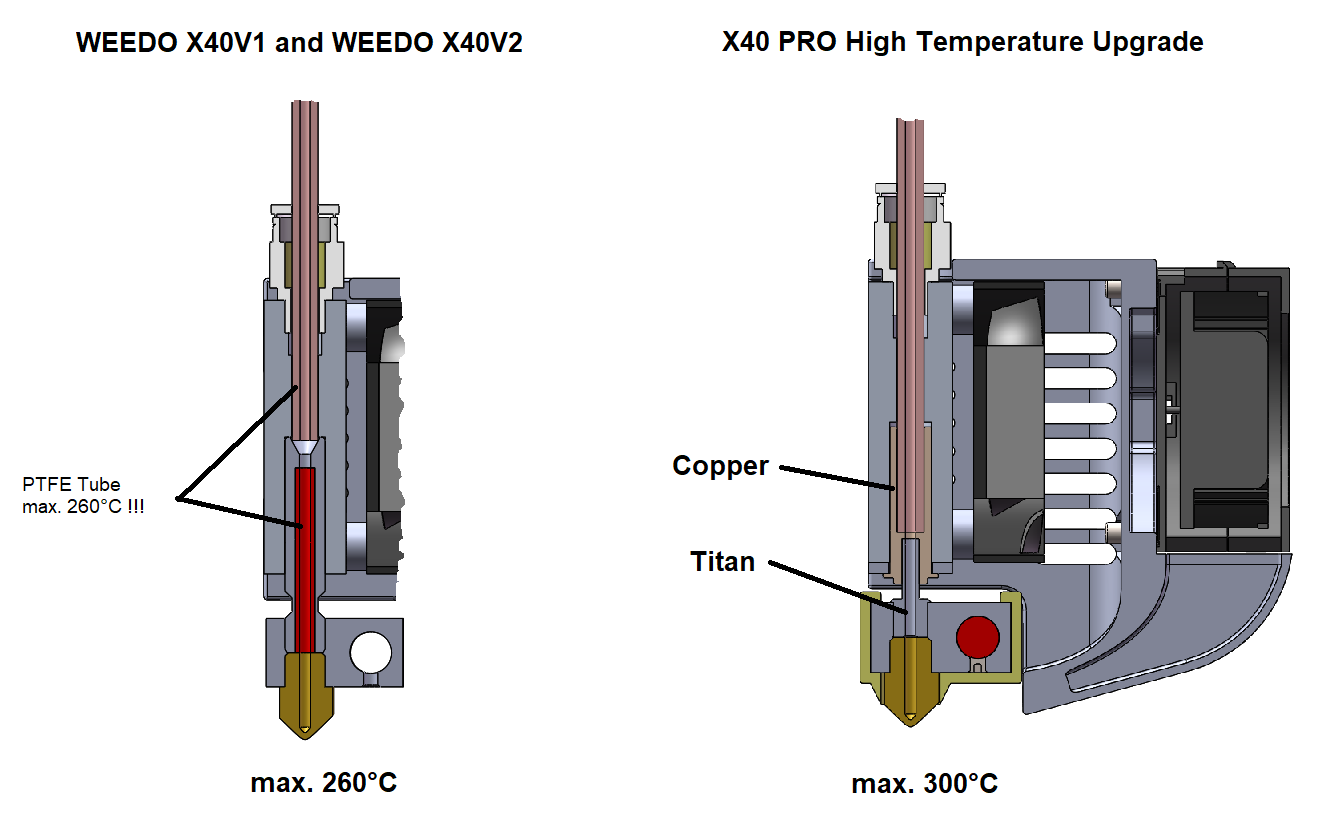
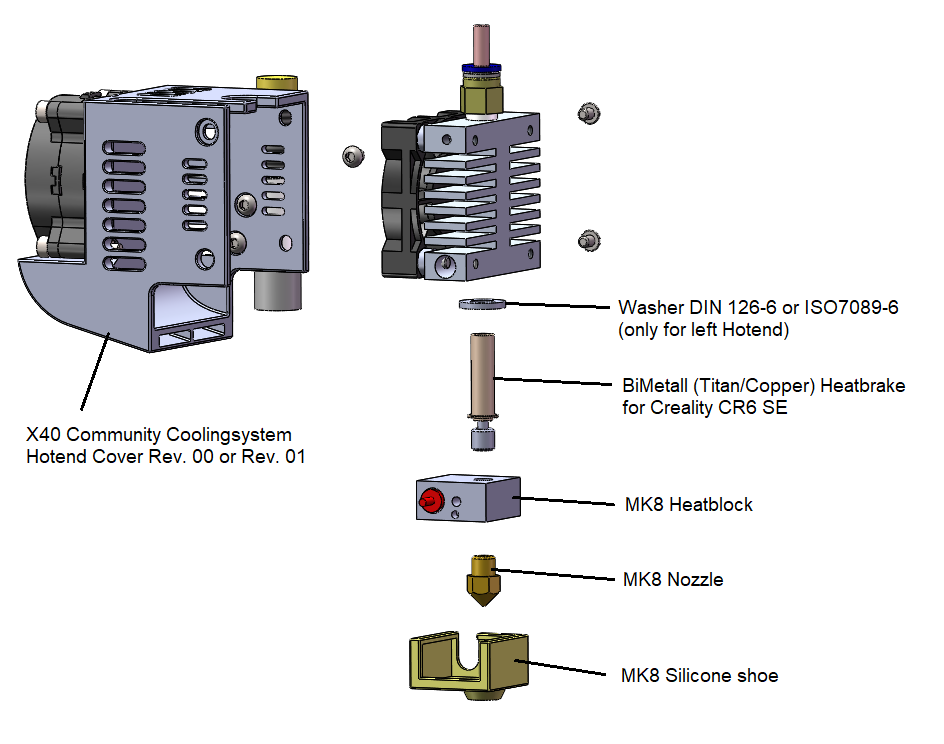
Luckily, it turned out that the BiMetal Heatbrake for the Creality CR-6 SE is only one millimeter shorter than that of the Weedo X40. With one washer you get almost exactly the right size to continue using the X40 PRO cooling system.
- Noname BiMetall Heatbrake for Creality CR-6 SE (Tested Version)
- Brozzle BiMetall Heatbrake for Creality CR-6 SE
- Tuning Part MK8 Heatblock from Micro Swiss (Recommendation)
- Steel or Ruby Nozzle MK8
Advantages of a BiMetal Heatbrake
Thanks to a bimetal heat brake, the heat does not migrate upwards even with many retractions. This ensures that the filament does not melt too early and does not clog the nozzle. A bimetal heabrake also improves the behavior of low-temperature materials such as PLA. In addition, a larger temperature gradient between the hot and cold part is possible. This allows high-temperature filaments to be processed.
Of course, you can also use the BiMetal Hearbrake without a firmware update. However, the maximum temperature of 260°C then remains. However, you have to carry out a PID tuning, since the bimetal heat brake has a different behavior to which the control loop must be adapted.
Disadvantages of a BiMetal Heatbrake
Some filament can become blocked if the cooling is set too high. The blockage can be easily unblocked by increasing the temperature and reducing or stop the cooling.
For me, the blockage has only occurred with the Colorfabb PA Neat filament.
The problem can also occur if the retraction is too large.
X40 PRO Firmware for High Temperature
The firmware must also be adapted for the higher temperatures. The firmware that is enabled for higher temperatures was appended with the abbreviation HT. You will soon be able to download the new firmware in the HT version from the X40 PRO firmware page.
You can also use the upgrade with all other firmware variants. However, the printing temperature is then limited to a maximum of 260°C.
Ultimaker Cura for High Temperature
Cura configuration for the Weedo X40 PRO is also limited to 260C° in the current version. With the next release, the Cura configuration will be activated up to 300°C.
Setup
With the BiMetal Heatbrake it is not easy to get a constant temperature. With the right PID parameters you can get it between 200°C and 260°C, but above 260°C the temperatures start to fluctuate for me. I haven't found a better solution until now.
My current PID parameters:
- P11.83
- I0.94
- D37.22
In order to avoid the Heating Failed Error, both heating cartridges should be identical and the same parameters should also be used. Since the firmware only supports one PID set for both nozzles, this should always be the case.
Filament for High Temperature printing
Especially with technical filaments such as PC and PA, the difference in the Cura printing profiles between visual and engineering becomes clear.
With the Visual Profile, good optics have priority, so cooling is used here. The strength, especially the layer adhesion suffers here. The engineering profiles are optimized for strength and precision, which is why cooling is significantly reduced or even switched off for some filaments. With PC and PA, the layer adhesion is therefore very good, but you have to accept optical defects if necessary.
The following filaments are tested and Cura print profiles are created:
- Colorfabb PA Neat
- 3DJake PCTG
- Polymaker PolyMax PC
- Fiberlogy PCTG
- AddNorth Adura Nylon
- Fillamentum CPE HG100
- Details
- Hits: 1586