How to use the Cura X40-Community print profiles
Cura and other slicers quickly have hundreds of parameters to adapt the filament to the printer and the printed object. This unmanageable number of settings not only produces good results, but also misprints due to incorrect operation.
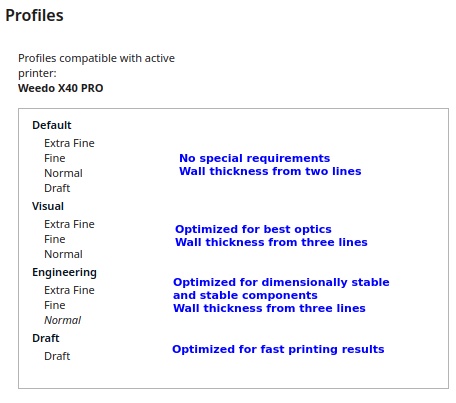
In order to significantly reduce misprints, it is advisable to create or use print profiles.
In the X40 community project, filaments were used that have a small diameter tolerance and are available in as many countries as possible. However, we cannot include all countries. However, the profiles can be used as templates to create your own profiles.
Please note that only the printing profiles are tested and matched with manufacturer names. Generic printing profiles are therefore more to be seen as a template for which you have to determine the optimal parameters yourself, such as the correct distances for easy removal of the support structure.
If you can buy the filaments and want good results quickly, then you should use the X40 community print profiles without making major changes. Actually, you only need to select the desired print profile and, if necessary, activate the support structure or switch/switch off the brim if necessary.
For more Information see Cura Quality and Intent Profiles
Setup
A 3D print will only be printed in good quality if the right material flow is set during printing. Even due to the tolerance of the filament, it may even be necessary to make corrections in order to get a perfect result. The flow of material is often not sufficiently taken into account by many and too much material results in overextrusion and too little material in underextrusion. Only with the right quantity is the component not only visually best, but also dimensionally.
|
The X40 community print profiles were matched to the AddNorth E-PLA reference material using the Weedo X40 extruder. Before you start with larger prints, you should make a test print with the AddNorth E-PLA and the corresponding print profiles. Do the flow test and then print the 20mm cube. If the cube has an edge length of 20+/-0.05mm, then everything is correctly aligned. If the cube is too big or too small during the test, then the material flow must be adjusted to the profiles. Determine the correct value using the material flow test and correct it using the M221 command. You only need to enter the command e.g. M221 S89 at the beginning of the Cura start script and have thus adapted all X40 community print profiles accordingly.
|
Which materials are recommended?
The different types of plastic also have different properties. PLA is easy to process, but has the disadvantage that it is not suitable for outdoor use. The most suitable material type therefore depends on your component The filaments from AddNorth are very good, but not exactly cheap and not that easy to get everywhere. Fiberlogy filaments are cheaper and easier to get.
My tip here is the Fiberlogy Impact PLA. This PLA is not much more expensive than standard PLA, but has significantly higher strength and layer adhesion.
You can see all material tests here.
Howto create new printing profiles
I recorded how I create the 11 new printing levels from the existing printing profiles. The video in the X40 community cloud only shows the creation of the base. Then the corresponding printing test for e.g. the support structure, bridges, raft etc. must be carried out and the parameters adjusted.
- Howto create a new Cura printing profile set (MP4 Video, only for community members)