Weedo X40 / X40 PRO printer setup
For all those who have not yet put a 3D printer into operation, this should be a small introduction. I wrote this tutorial because the Weedo instructions are incomplete. My printer was adjusted so that the Weedo instructions did not work.
|
Please note that the footprint of the printer affects the printer configuration. If you move the printer to a different location, you have to rerun the bed leveling and the Z offset. With a firmware update it is possible that the set configuration is lost. You can use the parameter backup function to save some parameters on the MicroSD card and import them again. With the latest X40 PRO firmware, all important parameters can be saved. |
1. Assembly
2. Mains voltage
3. Check cable connection
4. Setting the language
5. Firmware update
Attention:
There are two hardware versions of Weedo X40. Please make sure to install the correct version, otherwise the printer will not work properly. If you have installed the wrong firmware then only Weedo Flashing Software can correct it. The software and also the current Weedo Stock Firmware (Community_to_Official Firmware) can be found on the X40 PRO Firmware page.
6. X-axis prealignment
An exact alignment takes place later through the Bettleveing. The printer moves the print heads all the way up to the end stop and synchronizes the motors with it.
7. Set the Z-Level and Bed Level correctly
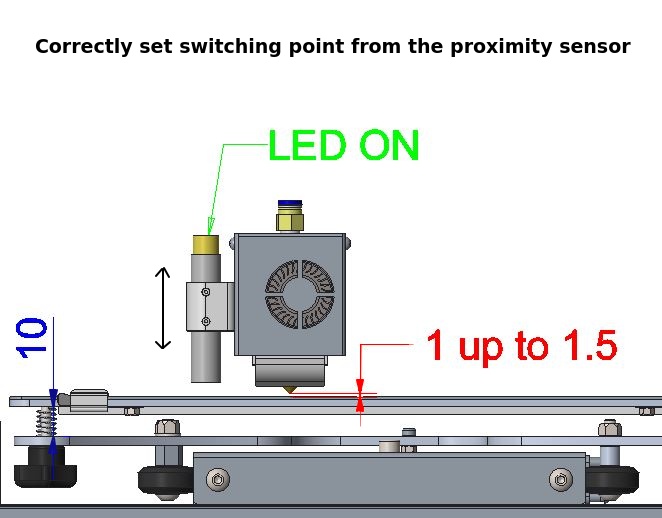
The correct setting of the Z-height is particularly important with the X40, since an incorrect Z-setting can damage the printer. The Weedo X40 is equipped with a so-called proximity switch. This sensor switches when a magnetic material reaches a distance of approx. 4mm. Since the printer cannot keep exactly at a distance of 0mm between the nozzle and the bed when taking measured values, a safety distance must be provided.
- Use the handwheels on the bed to adjust the corners of the bed so that the compressed spring is approx. 10mm - 11mm long. The distance must not be less than 10mm, otherwise you cannot set the Z offset. The lateral guide rollers then collide with the T-plate. If the distance is too great, it can happen that the bed set changes or becomes possible in XY movements.
- Use the arrow keys to move the left nozzle to the center of the print bed. Finally, use the arrow buttons on the display to reduce the distance between the nozzle and the heating bed to approx. 1-1.5mm. Now loosen the screws from the sensor and adjust the sensor so that the LED on the sensor just lights up.
- Now reduce the distance between the nozzle and the bed to approx. 0.5 mm. Carefully approach the corners of the bed, making sure that the nozzle does not collide with the bed. Now roughly adjust the bed using the handwheels so that there is approx. 0.5mm air between the nozzle and the bed.
- Now perform Z-Offset on the display. After the platform has been measured, the nozzle moves to the center of the bed. Place a sheet of paper between the nozzle and the bed and use the arrow keys to reduce the distance until the ball can just barely move. The offset value displayed should now be between -1mm and -1.5mm. If the offset is between -1mm and 0mm or even in the positive range, then the switching point of the sensor is wrong and a crash can occur. If necessary, adjust the sensor again. The sensor should switch when the nozzle is about 1mm to 1.5mm away from the bed. Click Save and complete the process and save the offset value!
- Now carry out Bed leveling via the display and set the bed exactly. Use a piece of paper to adjust the distance between the nozzle and the bed. The distance is correct if you can just move the paper in XY-directions without it kinking. The Z-height and the bed should now be set correctly. If the nozzle touches the print bed when using the bed knife, then you have done something wrong. When measuring, the nozzle must not touch the bed and certainly not press it down, otherwise the printer will spin and the printer may be damaged!
8. Printer calibration
If you are using the X40 PRO firmware or want to get better results with the stock firmware then you need to calibrate the printer. When using the X40 PRO firmware, a printer calibration must always be carried out.
Without a printer calibration, the desired print quality (nice surface, dimensional accuracy, etc.) may not be achieved.
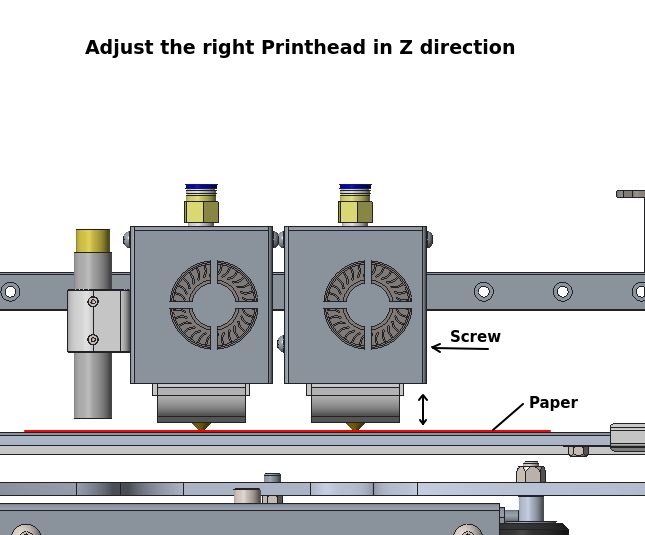
9. Adjust the Z-height of the right nozzle
Some have trouble getting the Z-Offset on the Weedo X40 print head right, so here's my tip. If your print bed is not aligned, then perform a manual bed leveling beforehand. Start the printer and move both printheads to the center of the print bed. Use the arrow keys on the display to move the printheads about 0.5 to 1mm over the print bed. Use a sheet of paper and place it between the print bed and both nozzles. Loosen the screw from the right extruder to adjust the height. Carefully lower the print heads using the arrows on the display until the sheet is pinched at the left nozzle. Press the right nozzle against the sheet of paper while tightening the screw. Both nozzles should now be pinching the paper and aligned. If the right nozzle is longer than the left one, you must first lower the left nozzle using the screw. Finally, don't forget to start the Z offset via the display.
10. Set the XY offset of the right nozzle
Please note:
| Please note that you have now only set up the hardware to your current status. It may be that a software adjustment to your hardware is now necessary (e.g. material flow). In addition, it must be taken into account that the processes must be repeated if there is a change, e.g. due to a nozzle replacement. The print bed can also be misaligned by removing it from the print object. |