
Uncategorised
Tarfuse ENVI 1 Filament from Grupa azoty
I did it again and I'm one of the first to test Tarfuse's brand new and eco-friendly ENVI 1 filament. Many are probably wondering who or what is Tarfuse and what kind of material is ENVI 1. Tarfuse is the filament brand of the Polish company Grupa azoty. I couldn't find out the composition of ENVI 1 until the end.
Tarfuse envi 1 is derived from renewable raw materials and is designed to be fully biodegradable, which means that it breaks down in the environment in the presence of microorganisms. After the biodegradation process is complete, only natural and harmless substances such as water, CO2 and organic matter remain. In the case of pure PLA, the biodegradation process occurs relatively quickly in industrial composting facilities, in biologically less active environments, i. H. in home compost bins, much slower. Tarfuseâ envi 1 biodegrades faster than pure PLA thanks to its structure. Tarfuse envi 1 is formulated with the environment in mind as less CO2 is released into the atmosphere during degradation.
Tarfuse envi 1 is characterized by excellent printability and detail appearance thanks to very good adhesion between layers and low linear shrinkage. The Tarfuse®envi 1 filament is intended for printing display models and advertising details.
Technical data sheet
- Tarfuse ENVI 1 Filament (PDF)
Printingtest
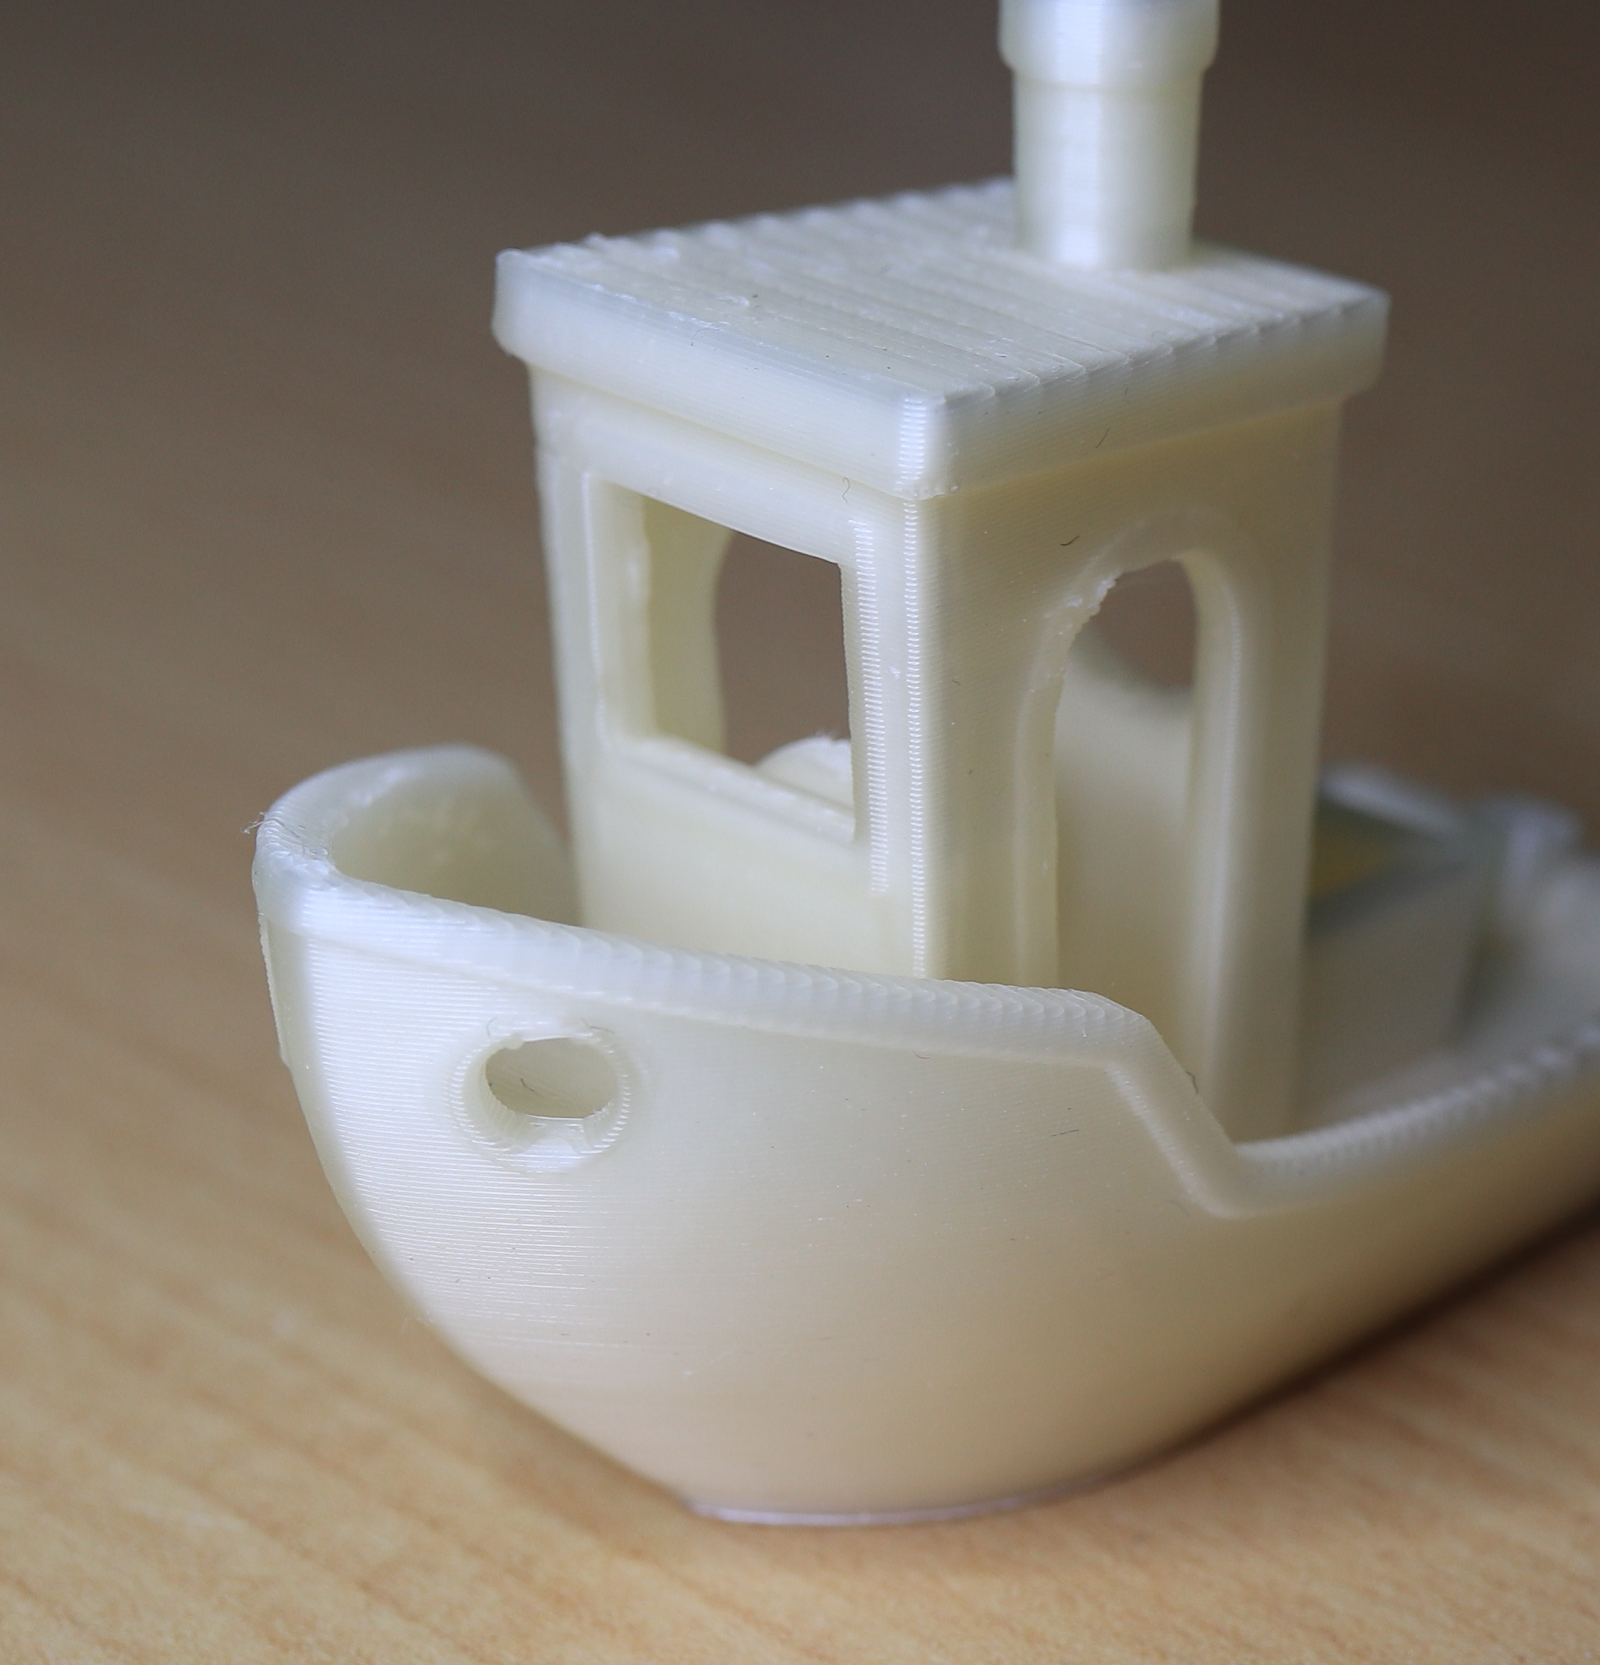
The first test print worked immediately and I was totally surprised. The Benchy printed with ENVI 1 with 0.2mm layer height has the best quality of all filament I have tested so far. The Benchy has no stringing at all, all bridges are printed extremely cleanly, all surfaces are very smooth and you hardly see the layers. Even the difficult overhangs on the Benchy bow are absolutely flawless. Please take a look at the enlarged photo of the Benchy (click on the photo), you will not find any major flaws. Just perfect.
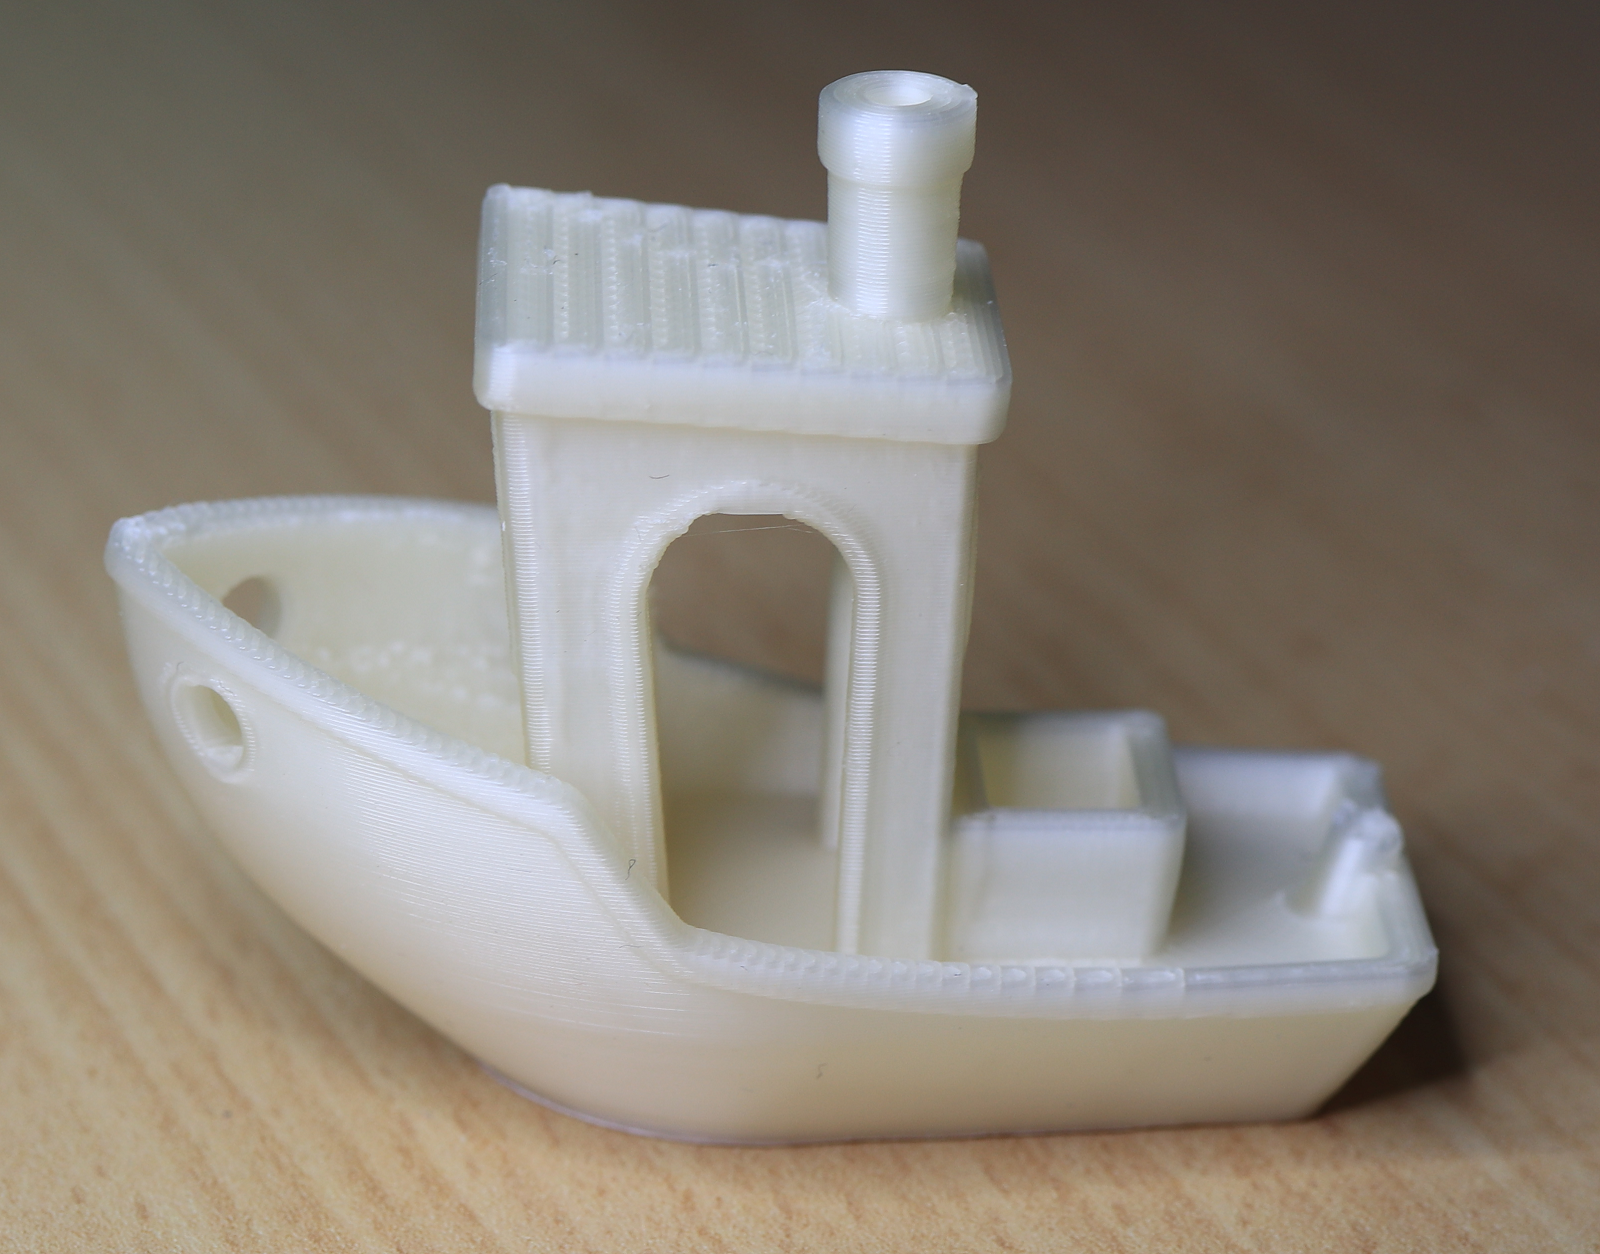
During the print test, I also noticed that the notices about slow printing have to be taken first. You can get good printing results with 20-40mm/s, if you print too fast, then lumps and quirks, holes appear on the component.
You can soon download Ultimaker Cura 5.0/5.1 print profiles for the Weedo X40 PRO printer profile from the X40 Community Cloud.
Conclusion:
I guess the filament is a PLA blend similar to NonOlien or Fiberlogy's PLA Mineral. If you have enough time, you can use the ENVI 1 to achieve excellent printing results in terms of optics. The layer adhesion also seems to be very good and the price of 35 EUR / kg is also still acceptable. On Polish sites you can even find it for 86 zt, which is the equivalent of less than 20 EUR.
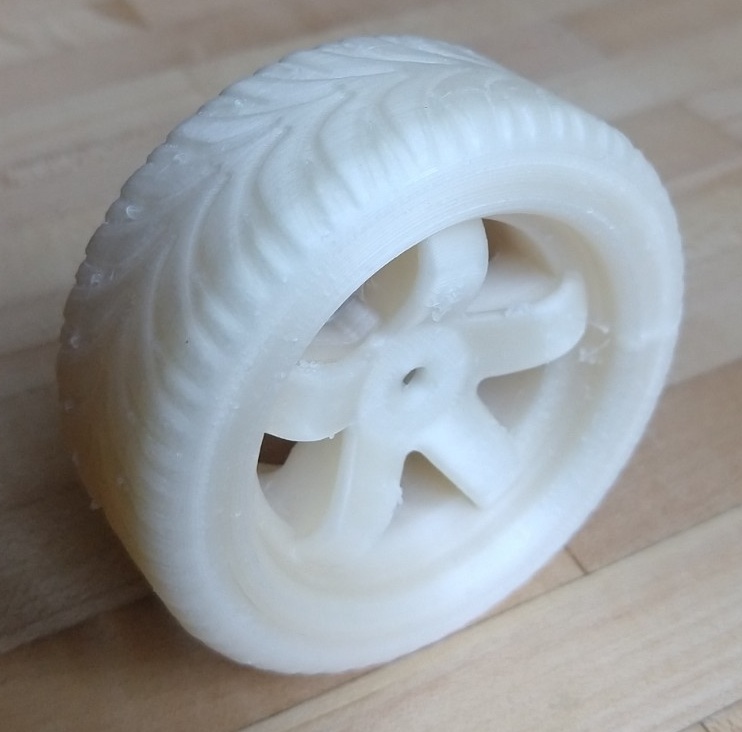
The filament is ideal for figures, architectural models and the like. Due to the good layer adhesion, it is also quite stable, so I would even recommend it for first preliminary samples. The filament is not well suited for technical components because the dimensional accuracy and strength are not sufficient.
The filament seems to absorb moisture quickly and stringing occurs. Printing directly from the drying box is best.
Do something good for your environment and buy NonOilen, ENVI 1 or Allpha if you don't absolutely need other properties.
- Details
- Hits: 17634
Print directly from Cura via the USB port
Weedo has published a patch with which you can print directly from Cura 4.X on the Weedo X40. The patch should work on all operating systems.
The patch has not yet been tried with Cura 5.X, but it should work.
Download
Install
Install the CH341 driver on your operating system. Unzip the Cura patch and replace the AutoDetectBaudJob.py and USBPrinterOutputDevice.py in the Cura directory plugins / USBPrinting.
Connect the printer to your computer with a USB cable. After slicing, you can select the Print via USB button.
Information
Please note that with the printer via Cura, the PC must remain switched on until printing is or has been ended.
- Details
- Hits: 20123
Update Cura configuration

Reset Cura
If you have changed the start code in Cura, then Cura creates a user-dependent configuration. If the revision in the startcode does not match the release, then you need to reset Cura. You can read how to do this on the Ultimaker homepage.
The user configurations of Cura are not deleted when Cura is uninstalled! With every update it should therefore be checked whether a Cura reset is necessary.
Update Cura 3MF Project file
Update Cura application
Most likely, Cura 4.9 will be released in May / June. Since the release also bugfixes for the dual print and other useful features such as the display of the Z-seam, many will switch to the new version. We will of course also provide a configuration for Cura 4.9. During the Cura installation under Windows you will be asked whether you want to uninstall the old version. I would recommend that you keep the older version installed in parallel for a while. In the event of problems, you can then switch back quickly.
- Details
- Hits: 21105
Wear parts, spare parts and tuning parts for Weedo X40
In the X40 community cloud you will find eDrawings with which you can view the printer and the individual parts on the Computer. You can use the Windows exe files with the integrateted viewer or download the eDrawing viewer.
The following eDrawings are available:
- Weedo X40V1
- Weedo X40V1 PRO
- Weedo X40V1 PRO BMG

Wear parts
| Description | Dimension / standard | Items | Source of supply |
|
Filament |
For Ultimaker Cura with the X40 Community configuration it is recommended to use the supported materials. | ||
|
Nozzle 0,4mm |
Long life MK8 nozzle | ||
| Nozzle 0,6mm | Long life MK8 nozzle | ||
| Nozzle 0,8mm | Long life MK8 nozzle | ||
| Silicon socket | MK8 |
|
|
| Build surface | 310mm x 310mm | ||
| Brush (copper wire) | 12,5mm x 40mm
|
||
| Flexible Build System | 310mm x 310mm |
Spare parts
| Description | Dimension / standard | Items | Source of supply |
| Buildplate | Weedo X40 | 310mm x 310mm Buildplate Pei | |
| Heatbed | Weedo X40 | 310mm x 310mm | |
| Hotend | Weedo X40 |
Weedo X40 Nozzle kit |
|
| Heatsink | |||
| LCD Display | Weedo X40 |
Weedo 4.3'' Touch Screen for WEEDO 3D Printer X40, F152S, ME40 Pro, F192. |
|
| Mainboard | Weedo X40 |
Weedo Motherboard R73 for WEEDO X40 |
|
| Relais Board | Weedo X40 | Weedo Relais Bours for X40 | |
| Extruder / Runout Sensor | Weedo X40 | Extruder / Runout Sensor | |
| Cooler | Weedo X40 | Hotend heatsink | |
| Power supply | Power Supply 24V 480W |
JoyNano 480w 24v 20a ac-dc |
|
|
Heating cartridge |
24V 50W | ||
|
Thermistor |
100k Thermistor | ||
| Heatblock | MK8 | ||
| Heatbrake |
All-Metal MK8 Heatbreak for Weedo X40
|
The heat brakes for Makerbot 1 Dual, CTC Bizer and Flashforge Creator are identical, but have no key area. | |
|
Bowden cable |
Outer diameter 4mm, inner diameter 2mm, length approx. 500mm | Capricorn PFTE XS Bowden Tubing | |
|
Extruder-Fittings |
Depending on the extruder |
||
|
Inductive proximity switch |
M12x1 , Lenght 62mm NPN, 6-36VDC, |
||
|
Linear guide carriage |
For Weedo X40 X-axis |
Type MGN12C |
|
|
Camera / Wifi Modul |
|||
|
Cable and adapter board |
Weedo X40 |
Tuning parts
| Description | Dimension / standard | Items | Source of supply |
| X40-Community Part Coolingsystem |
Improved cooling system for the Weedo X40 | ||
| Fysetc BMG Extruder LH / RH |
Full Metall Dual Gear Extruder with 3:1 gear ratio |
An adapted firmware such as the X40 PRO BMG is required for use | |
| BiMetall Heatbrake | BiMetall Heatbrake for Creality CR6 SE | We need for temperatures above 260°C, so that the PFTE hose does not melt. (X40 PRO HT Firmware required) |
|
| MK8 Heatblock | 20x20x10 Micro Swiss Part: M2587 |
Micro Swiss Heater Block Upgrade with Silicone Sock for CR10 / Ender 2 / Ender 3 / ANET A8 Printers MK7, MK8, MK9 Hotends |
|
- Details
- Hits: 27927
How do I calibrate the XY offset with Ultimaker Cura
If you want to set the XY offset very precisely, you need a different tool than Weedo offers. For our setting you need a vernier caliper or a micrometer. If possible, use two identical materials from the same manufacturer, but different colors, for the setting. First of all, the dimensional accuracy must be checked and adjusted. This is important so that you can use different materials and manufacturers together (materials have different shrinkage, etc.) Perform the dimensional calibration e.g. according to the instructions Teaching Tech 3D Printer Calibration. The correction factors are inserted in the Cura Configuration X40 PRO. You may not need to do this then. Then print the 2x2 checkerboard pattern without an offset (middle of the settings on the touch display). If the offset is greater than 2mm, then the tension on the belt is no longer correct. If necessary, adjust the belt or the offset.
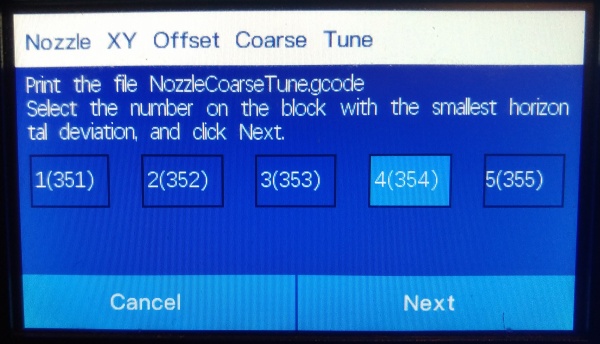
Cura Plugin
Firmware
With the Weedo X40 1.2.5 firmware and the X40 PRO firmware up to version 1.2.5.6, X is then nominal size 353mm. From X40 PRO firmware 1.2.5.7 the nominal size is 5mm smaller (347mm) due to the bug fix. For the latest X40 PRO firmware, a correspondingly adapted gcode is therefore also required, which you can only generate via the latest X40 community Ultimaker Cura configurations for the Weedo X40 PRO or have to adapt the slicer accordingly.
For a conversion from a 1.2.5.6 version to a newer X40 PRO version you only have to reduce the X value by 5mm (e.g. via the M218 command or the backup function). From firmware version 1.2.5.9 you can specify the XY offset with an accuracy of two decimal places.
- Weedo X40 Stock Firmware 1.2.5 => 353mm +2.5mm / -2.4mm
- Weedo X40 PRO Firmware up to 1.2.5.6 => 353mm +2.5mm / -2.4mm
- Weedo X40 PRO Firmware 1.2.5.7 and 1.2.5.8 => 347mm +2.5mm / -2.4mm
- Weedo X40 PRO Firmware 1.2.5.9 or newer => 347mm +2.55mm / -2.44mm
Please note that the firmware stores the offset via the offset GUI's internal button numbers. When changing the firmware, problems can therefore arise due to the different offset values. The easiest way is to set the offset using the M218 command. After that, the GUI works as usual.
M218 Command
You can not only enter the XY-Offset via the printer display, but also transfer it to the printer via the M218 command. The firmware can only store offset values that can also be entered on the printer via the display. If you send values outside the valid range to the printer via the M218 command, then the value is changed to the allowed min or max value. After you have sent the new value to the printer via M218, the value must be stored in the EEPROM via the M500 command.
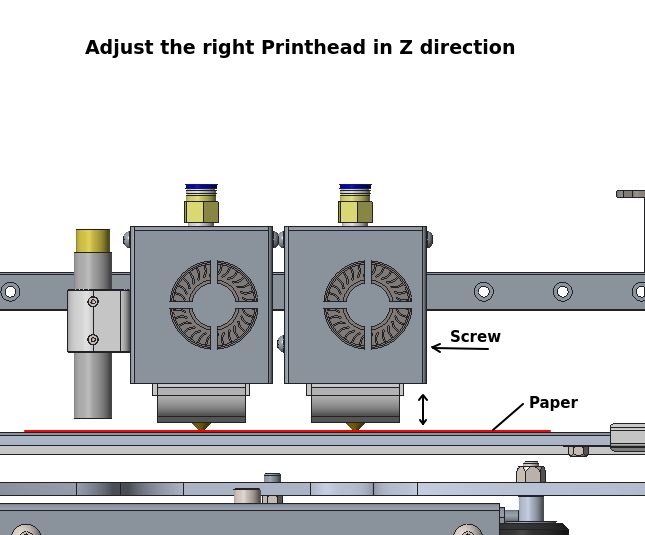
Z-Offset Calibration
Some have trouble getting the Z-Offset on the Weedo X40 print head right, so here's my tip. If your print bed is not aligned, then perform a manual bed leveling beforehand. Start the printer and move both printheads to the center of the print bed. Use the arrow keys on the display to move the printheads about 0.5 to 1mm over the print bed. Use a sheet of paper and place it between the print bed and both nozzles. Loosen the screw from the right extruder to adjust the height. Carefully lower the print heads using the arrows on the display until the sheet is pinched at the left nozzle. Press the right nozzle against the sheet of paper while tightening the screw. Both nozzles should now be pinching the paper and aligned. If the right nozzle is longer than the left one, you must first lower the left nozzle using the screw. Finally, don't forget to start the Z offset via the display.
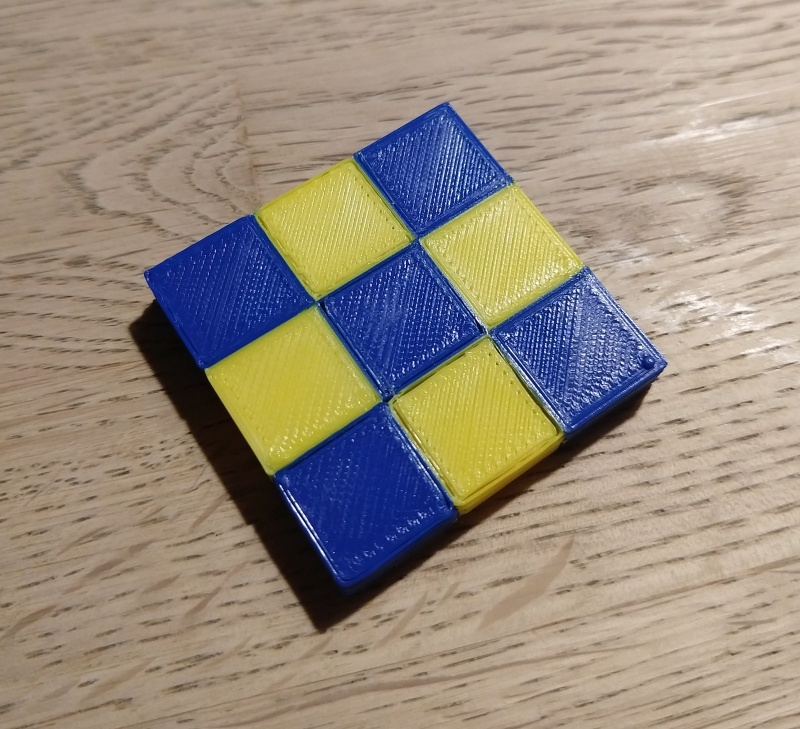
XY-Offset Calibration with 2x2 Checkerboard
In the x40 community cloud directory there is a subdirectory with the name XYZ_Calibration_Tool.
- Download the files XYZ_calibration_2x2_part1.stl and XYZ_calibration_2x2_part2.stl.
- Create the print model with Cura according to the instructions.
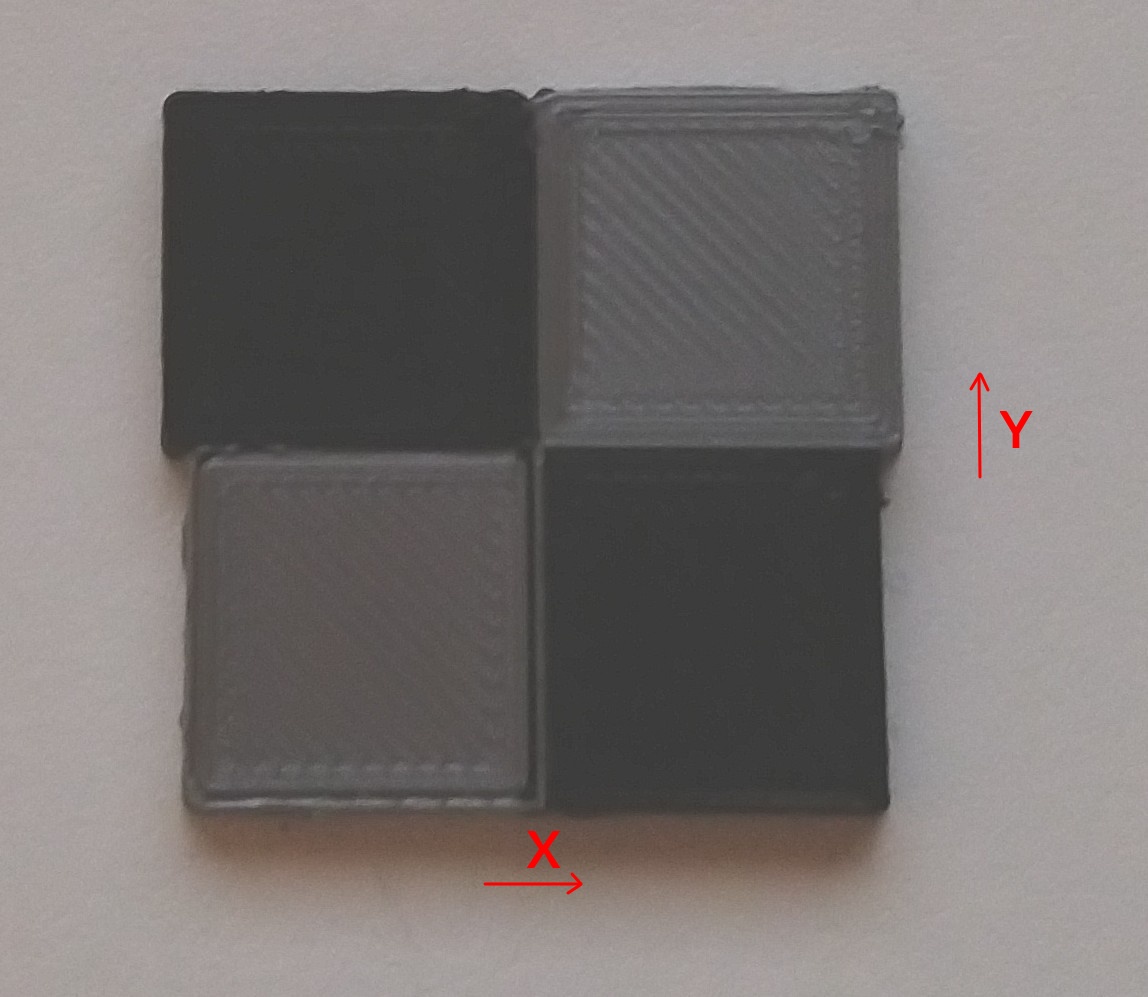
- Print the model with two different colors and without an offset (Average dimension for the touch display, X=353). The left front rectangle should be printed with the left nozzle and the right front rectangle with the right nozzle so that it is easier to see whether the offset needs to be increased or decreased. It is recommended to use AddNorth E-PLA, as the material has very low shrinkage and can reproduce the edges very nicely. Before releasing the model from the platform, check the offset and note the orientation of the model to the axes. You can also write the orientation of the model with a pen.
- Now measure the rectangle with a caliper. The rectangle should measure 30mm x 30mm. If it is smaller or larger, then you very likely have an offset.
If there is a deviation of 1,5mm or more, the belt should be retightened. The X offset is limited to 353 +/-2.5 (347+/-2.5 up X40 PRO Firmware version 1.2.5.7) by the firmware. Larger or smaller values are not accepted!

If the dimension of the front row is smaller than that of the rear, then the dimension of the offset must be increased. If the dimension is larger, the offset must be reduced. In my example, the rectangle measures 31mm or 29mm in the X direction and 30mm in the Y direction. So we have an positv offset of 1mm in the X direction.
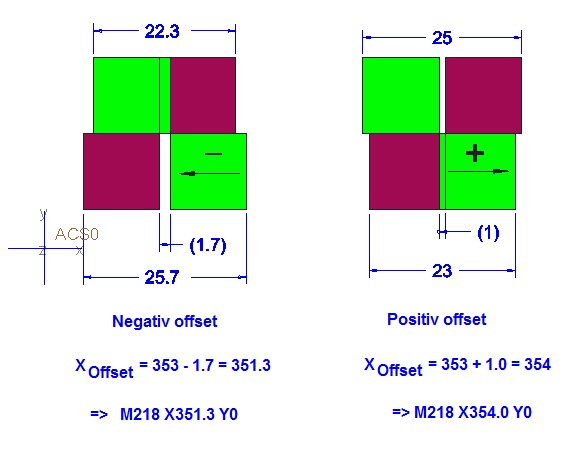
To correct the offset, I go to the XY-Offset menu on the printer and shorten the distance by 1mm. I switched from 5 (353) to 4 (352). Depending on the firmware version, the dimensions of the picture may be different. Weedo integrated corrections in the course of the software development.
To be on the safe side, I'll print the model again to check the change. If the surface of the checkerboard pattern is not to form a continuous plane, then the nozzle must also be set in the Z direction.
You can also transmit the offset via Pronterface or Octoprint with the M218 command. Enter e.g. M218 T1 X354.0 to set the offset to 354.0mm. Alternatively, a parameter backup can also be performed on the MicroSD card. Then simply open the config.sav file with a text editor and adapt the M218 accordingly. After saving, reinsert the MicroSD card into the printer and import it again using the parameter function.
Superfine tuning
With the X40 PRO firmware version 1.2.5.9, SuperFine Tuning is introduced. The XY offset can then be set with an accuracy of 0.01mm.
Before printing from the chessboard, please check whether the target line width matches the actual line width. If not, then the line width must be adjusted via the material flow.
The offset is set perfectly when the outer dimensions (within the scope of printing accuracy) are the same everywhere.
If the fields on the chessboard are not to be connected sufficiently, then the material flow should be increased slightly. The outer dimensions and the overlap will then be slightly larger.
How do I recognize a properly tuned XY-Offset?
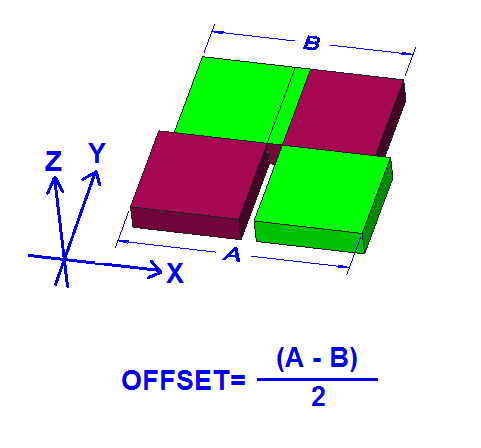
With the best possible matched XYZ offset, in the 2x2 checkerboard pattern, the outer dimensions A and B are identical in the X and Y directions and all four rectangles are fully connected to one another at the connecting surfaces. In addition, the surface (Z-direction) forms a continuous surface without a clearly noticeable offset between the colors. The colors must also form a clean separation and not be clearly visibly printed into one another.
- Details
- Hits: 26481