Cura Plugin for Weedo X40 / X40 PRO
Over time, the Cura plugin has also developed from a snapshot plugin to a full plugin for the Weddo X40 / X40 PRO. Due to the different range of functions between the Weedo Stock Firmware and the X40 PRO Communtiy Firmware, the plugin for the Stock Firmware can only be used partially. The current Weedo X40 PRO plugin is only available for Cura 5.X!
Some features should also work on the Weedo ME40. Since I don't own the device I can't check it.
Please use the X40 PRO Cura configuration 2.0.0 (Start script Rev. 16) or newer and X40 PRO Firmware 1.2.5.9 or newer.
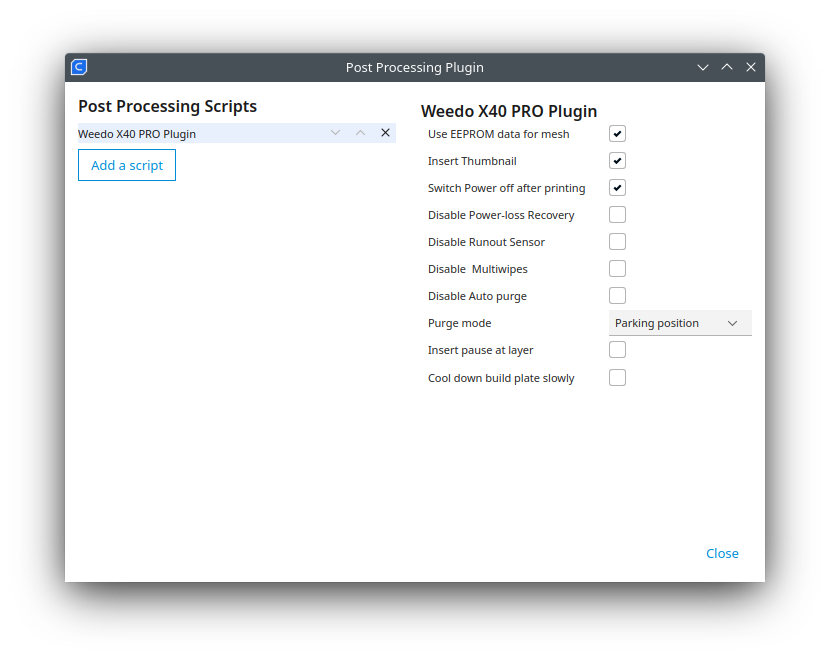
Image: Weedo X40 PRO Plugin Release 2.0.0
| After activating the post processing plugin, the plugin remains active with the settings you have made until you change or remove it! Control commands added to the gcode are marked accordingly for information. |
Feature from Release 2.0.0:
- G-Code auto conversion
The script automatically detects which operating system is being used. To avoid the display bug, the gcode is automatically converted to the DOS standard in Linux and MacOS. - Use EEPROM data for mesh
When automatic bed leveling is performed, the measurement data is stored in EEPROM. If this function is activated, the automatic bed leveling is deactivated at the start of printing and the last measurement data from the EEPROM are used instead. You can only use this function if you have not made any major changes to the print bed. With a large, long print, you should always use automatic bed leveling to ensure the best possible bed adhesion. - Insert Thumbnail
If the Insert Thumbnail function is activated, a 180x180 pixel preview image in JPEG format is embedded in the gcode. The thumbnail can be displayed on the print display or via the Octopi Thumbnail Plugin from ours distribution. Unfortunately, the background of the image is black because Cura does not allow a different setting for JPEG's. - Switch Power off after printing
When activated, the M81 control command is inserted at the end of the gcode, which switches off the print. If you control the printer via USB or LAN, then Auto Power Off must be switched off on the printer. To switch off the printer anyway, activate this function in the plugin. - Disable Power-loss Recovery
With the Weedo X40, the power-loss recovery function is active by default. In the event of a power failure, you will be asked if you want to continue printing after switching it on again. This only works if you have printed from the MicroSD card. If you control the printer via USB/network, then power-loss recovery should be deactivated, as it does not work and there is no query after switching on again.
- Disable Runout Sensor
This function works only correctly with the firmware 1.2.5.8 or newer. This option works like a switch. If you activate the option, then the runout sensor will be deactivated, otherwise the runout sensor will be activated. - Disable Multiwipes
With the X40 PRO firmware you can activate/deactivate a wiping function (command M923) when changing the tool (LH/RH or RH/LH), which removes filament residue from the nozzle and makes the print cleaner. By default, Muliwipe is active. Disable Multiwipe when using a Prime Tower for printing. - Disable Auto purge
With the X40 PRO firmware you can activate/deactivate a pre-extrusion (command M922) during tool change (LH/RH or RH/LH), which is carried out before the tool change and the multiwipe function. Disable Auto purge when using a Prime Tower for printing. - Purge mode
Purge mode can only be used if Disable Auto purge is not active.
- Parking position
If Parking position is selected, the gcode is not changed, the purge is carried out in the parking position
- Print purge line
This function can only be used in Single LH, Single RH, Duplicate or Mirrored modes. When activated, the purge in the parked position is replaced by a regular purge line on the left side of the print bed.
- Duplicate / Mirror Mode purge
This option can only be used in Duplicate or Mirror mode. When activated, the print bed is moved forward for the purge. - Insert pause at layer
With this function you can insert an M0 pause command (works only with X40 PRO Firmware) at the specified layer. To continue printing, confirm on the display. The pause function only works when you print from the MicroSD card! You can use the pause function to insert and embed a component, e.g. a nut, in the print. You can find out the correct layer using Cura in Preview mode and the slider on the right-hand side. - Cool down build plate slowly
To be able to use this function, you must deactivate the Auto-Power off and Save Energy functions on the printer touch screen. When this function is activated, the print bed after the printer is cooled down very slowly. To save power and know when the printer is finished, you should enable "Switch Power off after printing" option in the plugin. Slow cooling down reduces warping in ABS and PA, for example.
Use with other scripts together:
If you want to use the X40 PRO script with other post-processing scripts, then the X40 PRO script should be executed last, i.e. at the bottom of the list. You can change the order using the arrows.
Download:
Cura 5.X plugin
- Weedo X40 PRO Plugin 2.0.0 (only for X40-Community member)
- Weedo X40 PRO Plugin 1.2.0 (only for X40-Community member)
- Weedo X40 PRO Plugin 1.1.0 (only for X40-Community member)
- Weedo X40 PRO Plugin 1.0.0 (only for X40-Community member)
- Snapshot Plugin Version V1 => only for Windows (only for X40-Community member, outdated)
- Snapshot Plugin Version V2 => for Linux and MacOS (only for X40-Community member, outdated)
- Pause Plugin (only for X40-Community member, outdated)
Cura 4.X plugin
- Snapshot Plugin Version V1 => only for Windows (only for X40-Community member, outdated)
- Snapshot Plugin Version V2 => for Linux and MacOS (only for X40-Community member, outdated)
Show preview image on Weedo X40
Since the background of the picture is black, black models cannot be displayed correctly. Unfortunately, we have not found a solution to change the background from the image to white.
Installation
Installation Cura 4.X for Windows:
Copy the script X40Shnapshot.py into the Cura subdirectory:
plugins\PostProcessingPlugins\scripts
Installation Cura 5.X for Windows:
Copy the script X40Shnapshot.py into the Cura subdirectory:
share\cura\plugins\PostProcessingPlugin\scripts
Installation Cura 5.X for Linux:
Copy the script X40Shnapshot.py into the Cura subdirectory
~/.local/share/cura/5.0/scripts
Application:
Click in Cura:
- Extensions -> Post Processing -> Modify G-Code
- Now add the script.
The script is now permanently active for all projects. If you don't need it, you have to actively remove it again.